Using SSIS to Loop Over Result Set and Dynamically Generate Output Files
 April 9, 2011
Filed under BIDS, SSIS
Tags: BIDS, Control Flow, Foreach Loop Container, ResultSet, Select (SQL), SQL, SQL Server Integration Services, SSIS

This post is inspired largely by Ken Simmons’ excellent primer at SQLServerCentral.com. All I’ve done is extend it to a full result set.
Scenario: Let’s suppose one of the more successful sales partners at your organization created a slick spreadsheet in Excel that tracks key performance indicators. After a meeting, the entire department wants their own individual CSV so they can build a spreadsheet that looks exactly like hers. With some quick work in SSIS, it’s possible to deliver a unique CSV for each person.
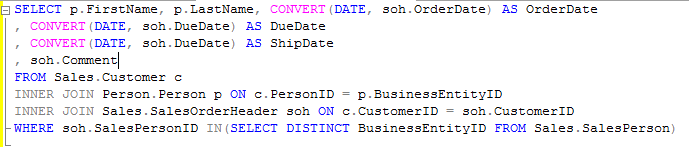
The sales department wants to tracks orders along with customers, perhaps something like the query below:
We will want only the customers for whom the sales person has an order with to get included in the sales person’s spreadsheet. To start, we will begin as Ken Simmon’s article begins. In your SSIS project, drag an Execute SQL Task from the toolbox into the control flow.

Right click and edit the task. Set the ResultSet to, “Full Result Set”. In the SQL Statement section, make sure your ConnectionType is set to OLE DB and click on new connection.

Build out your connection as you normally would to the AdventureWorks database. Mine looks like the following:

Click the ellipses next to SQLStatement and put in the following query, “SELECT DISTINCT CONVERT(NVARCHAR(4), Sales.BusinessEntityID) AS BusinessEntityID FROM Sales.SalesPerson”:

Next, click the Result Set section in the Execute SQL Task Editor and click the, “Add” button, select, “New Variable, and create a variable as the one below. Set the Result Name to the number zero (0) and give it a variable name. Mine is User::SalesPersonResultSet.

Add another variable. I named mine SalesPersonID and gave it a type of string. Package scope here is important. The scope is set to package so that both the Foreach Loop and the Data Task will be able to use the same variable.

Drag out a Foreach Loop Container onto the Control Flow:

Edit the Foreach Loop Container and click on the, “Collection” section. Set your enumerator to, “Foreach ADO Enumerator”, select the ADO object source variable to be User::SalesPersonResultSet, and the default value of, “Rows in the first table” suffices for this example.

Next, click on Variable Mappings and add the User::SalesPersonID. Here we’re taking each value that is encountered in User:SalesPersonResultSet and setting it to User:SalesPersonID. The Data Task will then operate on SalesPersonID until the Foreach Loop ends.

Drag a Dataflow Task out and drop it into the Foreach Loop Container. Once you’ve done that, click on the Data Flow tab.

Click and drag an OLD DB Source out onto the Data Flow Task and edit it. Your connection manager screen should look like the following:

Click the Parameters button and modify it so it looks like the below:

Click, “Okay” until you’re back to the Data Flow Task tab. Drag out a Flat File Destination, and we’ll build it out much like Ken Simmons did in his article. Create a new Flat File Connection and set it up something like the following:

Next, click on the properties for the Flat File Connections and click on the, “Expressions” ellipses. Set your Property to ConnectionString and build your expression as it shows below:

Once that is done, it’s time to try it out. Click, “OK” until you’re back at the package and click the, “Play” button.

We check the output destination:

And we check the files themselves:

That’s it. I know the post is a little long. There’s lots that can be expanded upon. For example, we can try to change the package to output directly to Excel spreadsheets. I have not done this myself so I don’t know how much of the package must be changed to do so. That might make for a good follow up post. Another thing to do is change the output of the first query to have the sales person’s full name instead of BusinessUnitID, since no one would really find that user friendly. Thanks for reading!
